
DNS is a service that translates a domain name into a numeric IP so that one computer can talk to another. We deal with it all the time, but most mere mortals are not aware of their importance. In this article I’d like to show you how to change your computer’s DNS entries in Windows.
Why change DNS Servers?
In a nutshell, if all works well on your system, perhaps you don’t need to tweak those settings. However, if you can consistently see some websites but not others, or you get weird intermittent connection problems, then your DNS entires may be querying servers that are not as “hot” as others.
Faster DNS Servers can provide quicker answers, resulting in faster results when browsing.
When the IP address of a domain changes, it takes a while for this change to propagate through the world. Some servers know changes quicker than others. Some servers may not see new data at all for several days.
ISPs and corporate networks usually provide their own DNS Servers, but it’s never clear how good they are. Google and OpenDNS provide very fast and free services which usually outperform those provided by your ISP or corporate network.
Change DNS Servers in Windows 7, Windows 8.1 and Windows 10
It’s not easy to find this hidden option, but the good news is this works on all flavours of Windows.
Search for “Network and Sharing Center” which will bring up a window that lets you choose the option “Change adaptor settings”. This will bring up the list of networks, one of which is likely connected to the internet.

In my case it’s a LAN connection, but it could also be a WiFi connection. Right-click the appropriate one and choose Properties.
The next window looks rather scary and isn’t very intuitive for humans. Scour the list for something that relates to Internet Protocol Version 4 (TCP/IPv4) as highlighted here:
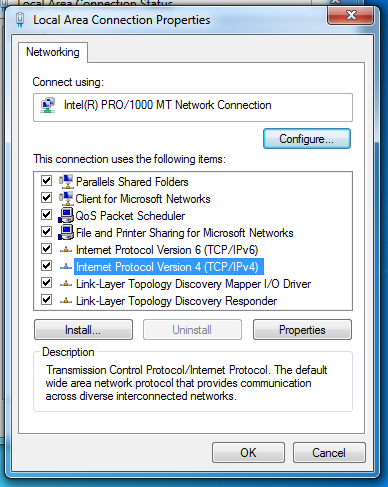
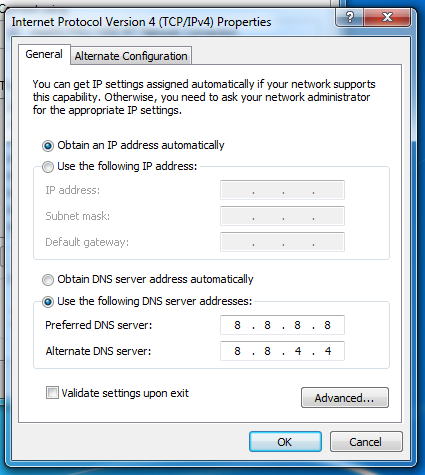
Select this item and click Properties. Another scary window opens. This one has two parts on the General Tab, and it’s the lower one about DNS that we’re interested in (the top part is for obtaining an IP address – let’s leave it alone).
The default is “Obtain DNS Server automatically” which means we have no idea who is being queried. Instead, select “Use the following DNS server addresses” and add both DNS Servers of your choice. In this screenshot I’m using Google’s DNS:
As soon as you hit OK the changes will be in effect. You can close all other windows we opened during the course of this setup.
Popular DNS Servers
Google’s DNS Servers are:
- 8.8.8.8
- 8.8.4.4
The OpenDNS Servers are:
- 208.67.220.220
- 208.67.222.222
There are many other free and premium DNS Servers you can use. Search for “free dns servers” and see lists like these: http://pcsupport.about.com/od/tipstricks/a/free-public-dns-servers.htm
Have fun 😉