
 Amazon EC2 instances have seriously made my life a lot easier over the last year. And once you get the hang of the management console it’s actually not as scary as I always thought it would be 😉
I’d like to get away from annual contract bindings and “real” servers that could develop hardware faults. But if you wanted to run Plesk on top of CentOS then this was a bit of a headache – until Parallels launched their Plesk AMI on Amazon Marketpalce. With this release we get the convenience of running Plesk out of the box with a convenient one-click install!
I’ve just tried it and took some notes so I won’t forget. You can also take a peek at the KB Article provided by Parallels which also outlines this procedure:
Step by step instructions
- log into your AWS console
- launch a new instance
- choose the marketplace option (the third one) and search for Plesk
- should come up with this: https://aws.amazon.com/marketplace/pp/B00A85NMY8
- choose your instance and create it
This will take a couple of minutes so grab a coffee and watch out for an email from Amazon confirming the subscription. Note that at the time of writing there’s no AMI for Plesk 11.5 – so we’ll just install Plesk 11 for now and update once we’re up and running.
You will be asked to use an existing Key/Value pair or setup a new one if you don’t already have one. This is essentially a keychain file with which your SSH client can connect to the EC2 instance. You won’t be able to login as root into the instance without this .pem file for security. We’ll download this in a moment.
Each instance is given a longwinded unique URL (such as ec2-54-123-45-227.compute-1.amazonaws.com) with which you can login immediately – but that’s not so good in the long term. Let’s create a static IP instead and associate it with our new virtual friend.
I’m assuming that the above has launched by now, so give the instance a name that describes what you’re doing with it. Onwards:
- create a new Elastic IP (on the left, under Network and Security)
- associate it with your new instance (this is where it helps to have a name, especially if you have more than one instance running)
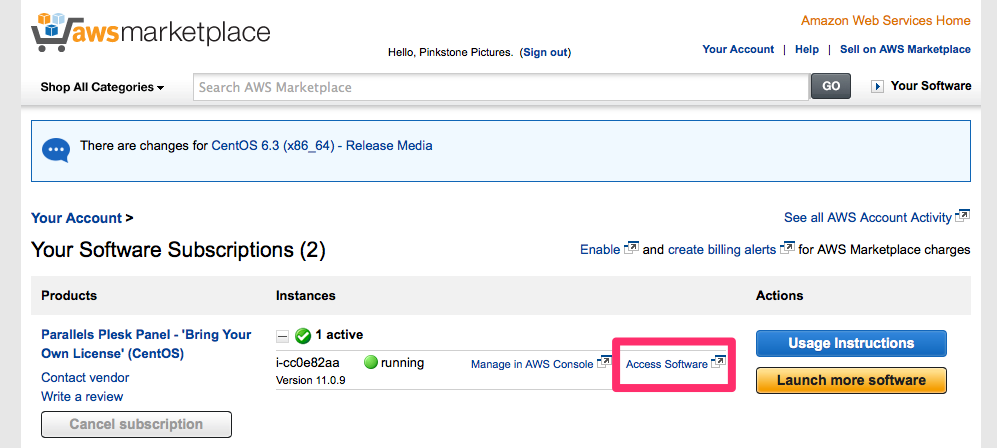
Amazon will provide a subdomain on which you can access your instance and go straight to the Plesk interface (on that longwinded URL, see above). You will find this in the Marketplace Dashboard (https://aws.amazon.com/marketplace) under “Your Account”, Software Subscriptions. Then click the little plus sign and select “Access this software”. This will get you straight to the Plesk login window.
I need an IP here, so I will tell Plesk about this via the command line. Let’s cover this next. My ficticious IP adrress going forward will be 12.34.56.78. Obvously replace this with your Elastic IP that you’ve setup and associated earlier.
Login to your instance via SSH, making sure you have your .pem file to hand. You can connect via the following command:
ssh root@12.34.56.78 -i yourfile.pem
You’ll get logged in without being asked for a password. Make sure you keep that .pem file in a safe place! This is a good time to yum update your server if you have a few minutes.
Next let’s tell Plesk about that new IP address. Since the setup is all dynamic, Plesk has been created without prior knowledge (or existence) of said IP, so issue the following command:
/usr/local/psa/bin/amazon_setup_ip 12.34.56.78
You’ll get no feedback but it will do the trick.
Now all we need is to find out what the default admin password for Plesk is so we can dive right into the web interface. Thankfully there’s a handy command for that:
/usr/local/psa/bin/admin --show-password
This should give you a cryptic 16 digit password with which you should be able to login to your new instance. Before we do this though, let’s reboot the server for all those updates to take effect:
/sbin/reboot
Once your instance is back, head over to your AWS Marketplace account and “access your software” as described above. This will allow you to access Plesk for the first time, set your IP address and hostname if you have it and create a new admin password.
At this point you can also login to Plesk with your Elastic IP, like so: https://12.34.56.78:8443
First Time Login
Once logged in to Plesk for the first time, you’ll notice that your Elastic IP is not displayed in Plesk. That’s because it’s an external IP pointing to your instance. Internally in Amazon’s network the IP is something else. You must add your Elastic IP here under ETH0 and make it a shared IP if you’d like to host multiple domains on this instance.
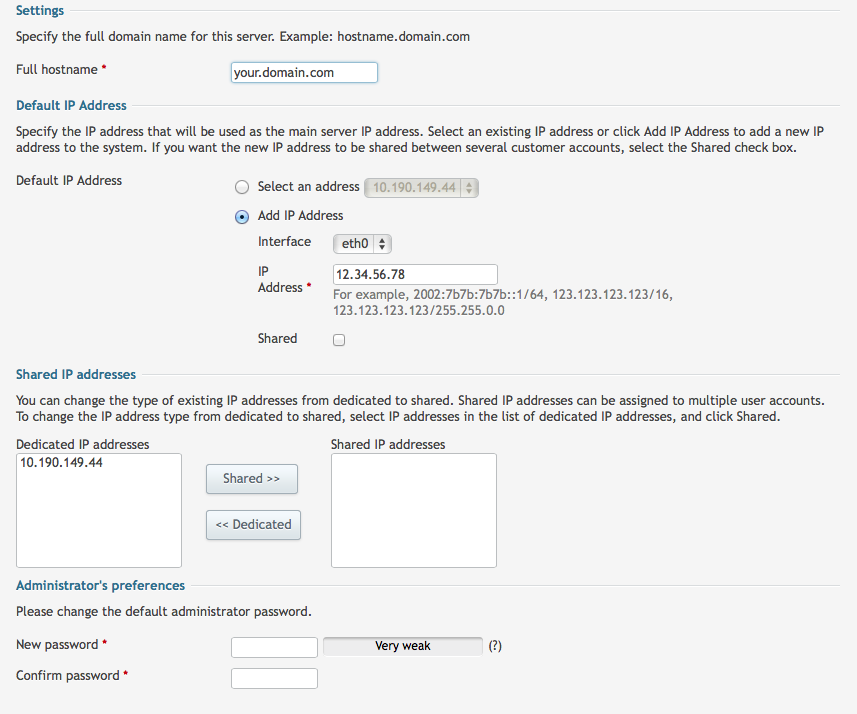
You can also give your instance a host name if you have a domain that points at your IP. The default is localhost.localdomain, and you can change this later via Plesk. Don’t forget to add your new (memorable) password at the bottom and hit OK to finish the first run process via the usual Plesk dialogue.
Upgrade to Plesk 11.5
Currently the AMI is only available for Plesk 11, and at the time of writing the current version is 11.5. Le’s update!
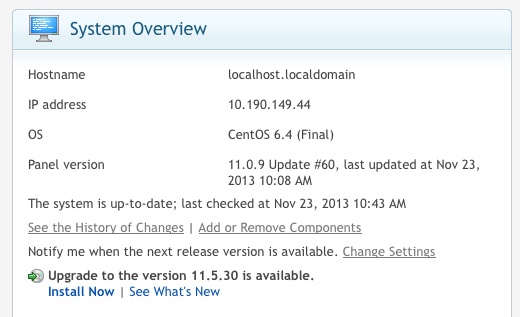
Hit Home and check out the System Overview box. This will show you that a later version of Plesk is available (11.5.3 at the time of writing – this may have changed by the time you read this). Choose Install Now and a new window opens on port 8447. You can install the upgrade from here.
This will take a few minutes, and a window may (or may not) offer you log output as it happens. Leave this window open and grab another coffee, it’ll install updates in the background.
Once finished, Plesk will have restarted itself, requesting you to login again. Do so with your new password and enjoy Plesk 11.5 😉
Getting a Plesk License
If you’ve chosen the “Bring your own License” AMI then you need to provide a license key for Plesk to function without limitations. As a Parallels Partner you can get a license from the Partner Portal. If you’re not a partner you can grab a single server license for $40 per month from here:
Alternatively, and great for testing purposes, you can request a 14 day trial license from Parallels here:
Alternatively you can choose to install the “Plesk Power Pack AMI” which is conveniently billed via Amazon at 7c per minute on top of the instance cost. This works out at $50 a month but makes your life a little easier if you wish.
I’ll cover how to add additional storage in this article.
Until then, Happy hosting 😉
Just thought I’d mention this:
Parallels also offer 4 AMI’s in total: CentOS and Windows, and those two come in “Bring your own License” (as described above), and “7c a minute” flavours. The latter includes a 14 day trial and comes to about $50 a month, without the need to buy a license separately.
Note that at this time the newer Amazon instances are not supported (M3, C3, anything that’s launched in or after 2013). I’m sure this will change when a new AMI comes out for next version of Plesk.
IMPORTANT UPDATE
With AWS instances you have two IP addresses – the Amazon internal one (default) and your Elastic IP. Your domains need to resolve to the Elastic IP of course, but when you setup a subscription in Plesk make sure to choose the Amazon IP. Otherwise your domains will resolve to the Plesk Default page.
This will cause a warning (along the lines of “This domain does not resolve to the correct IP address), but ignore this – your domains will work fine.
This is a necessary workaround due to the way NGINX works. Previously (in Plesk 11) Apache was redirecting the requests internally, but NGINX no longer does this. I’m sure this will be fixed in future versions of Plesk for AWS.
Thanks to Sergey and the team at the Plesk open Community on Google Plus for this fix!
Hi,
Thanks for the great tutorial. Got me over a lot of the humps. I have an m1.large instance running which has x2 400GB hard drives (not sure if these are RAID or not) but Plesk is only seeing/using the 10GB EBS volume.
Can you shed any light on this? I’m not sure if i should be having a smaller instance and bigger EBS or how I use the instance hard drive space. I’m using the EC2 to host approx. 30 low traffic websites.
Appreciate any clues.
Pat
Hi Pat, glad to hear you liked the article – always good to know I’m not alone out there in the tech jungle.
Some EC2 instances (like your large one) have associated disk space – it’s indeed RAID. The problem with this type of space is that it does not persist when your instance goes offline. Which is why the Plesk AMI does not make use of it and instead uses an EBS volume. If you need more space you’ll have to spawn a new instance with a larger EBS volume, or attach an additional EBS volume.
Let me know how the large instance copes with 30 low traffic sites. Mine crumbled with only a single medium traffic site (600-700 hits per day) which was very disappointing.
Jay,
You mention your large instance “crumbled”, does that mean it was insanely slow with periodic cpu spikes? That is what I am seeing with my m1.large test instance. Have you found a solution or does plesk just require a large or better to run effectively in production?