
![]() Using iCloud as Key/Value storage is almost identical to NSUserDefaults, except it populates to iCloud in the background and can be read from any device on the same account. What I find much harder than the code is how to make this work in Xcode.
Using iCloud as Key/Value storage is almost identical to NSUserDefaults, except it populates to iCloud in the background and can be read from any device on the same account. What I find much harder than the code is how to make this work in Xcode.
Here’s what we need:
- an App ID that has iCloud enabled
- a Provisioning Profile for this App ID
- an entitlements file, created by Xcode
- code to save data
- code to retrieve data
The Code
Let’s start with the easy bit. To store and retrieve key/value data in iCloud we use the NSUbiquitousKeyValueStore class, just like we’d use the NSUserDefaults class for local storage. Usage is identical:
NSUbiquitousKeyValueStore *cloudStore = [NSUbiquitousKeyValueStore defaultStore];
Once setup, we can store values like this:
[cloudStore setString:@"I'm live in iCloud! Woot!" forKey:@"testString"];
// optional
[cloudStore synchronize];
and retrieve data like that:
NSString *result = [cloudStore stringForKey:@"testString"];
Most the usual suspects from NSUserDefaults are available, including
– stringForKey
– arrayForKey
– dictionaryForKey
– boolForKey
– dataForKey
But of course, simply adding the code would be way too easy. We also need to let the Apple servers know that we want an App ID to save some data, for which we need a Provisioning Profile. Let’s create both next.
Creating an App ID
Head over to https://developer.apple.com/account/overview.action and under iOS Apps click on Identifiers Note you’ll need to login with your developer credentials.
You’ll see a list of existing App ID’s. Create a new one by clicking on the little PLUS icon in the top left corner, or click on an existing one to edit it. We’ll need to enable “iCloud” on our particular App ID.
Creating a Provisioning Profile for our App ID
Once the App ID knows it has iCloud enabled, we need to create a new Provisioning Profile for it. On the left hand side, under Provisioning Profiles, click on Development and either edit an existing one or create a new one for your App ID. Obviously an existing profile needs to be associated with our App ID, be that existing or new. A handy drop-down menu will help you out.
You’ll also need to specify the devices with which you’d like this profile to work. Tick them from the menu, along with your Development Certificates. This is what it should look like:
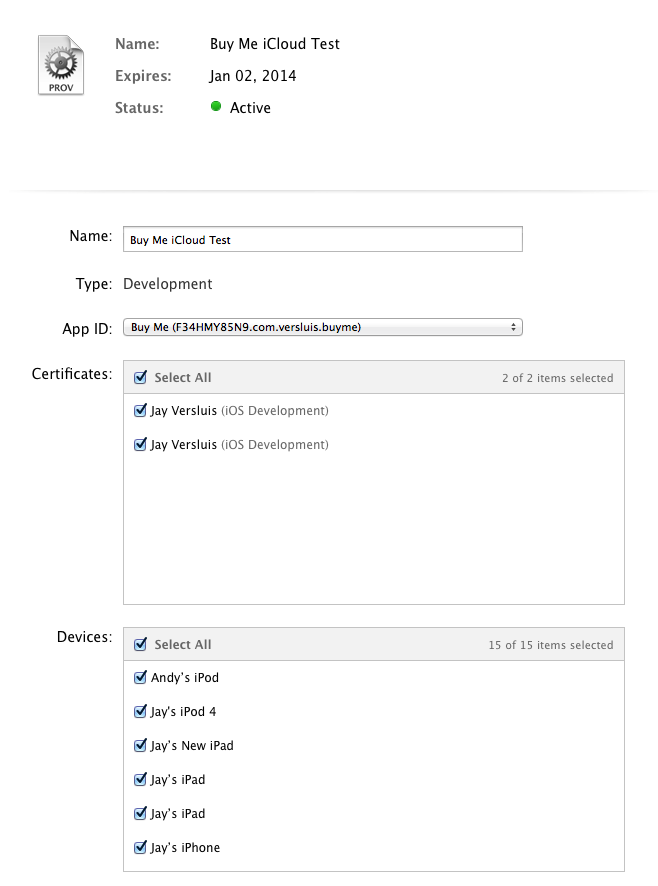
At the bottom click the big blue Generate button and a few moments later you’ll be prompted to download your new profile:

You must now download the profile and then simply double-click it in Finder (or the Safari download list) to import it into Xcode (4 and 5).
Adding and refreshing your profile in Xcode
In Xcode 4.6.3 you can verify that this has happened by opening the Organizer window, then under Library click Provisioning Profiles. You should see your new profile in here. There’s also a convenient refresh button which I believe downloads and installs new and updated profiles at the touch of a button.
In Xcode 5 the section for refreshing amended profiles has moved to Xcode – Preferences – Accounts.
In here, select your Apple ID and hit View Details. This will list all signing identities and Provisioning Profiles. You have the option to add more identities, or refresh existing profiles.
You can also head over to Editor – Provisioning Profiles – Import if you’d like to add a profile manually.
Adding iCloud Entitlements
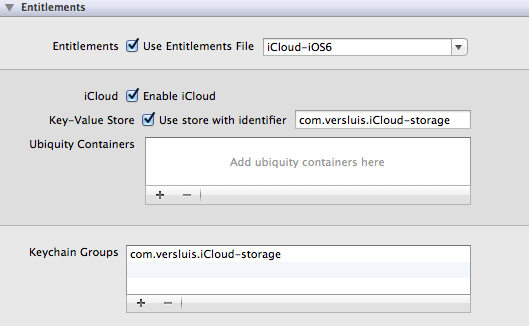
In Xcode 4.6.3 you need to head over to your target and in the Entitlements section, tick the Entitlements box. This will generate a .entitlements file in Xcode that you won’t have to worry about. Underneath it check the “Use iCloud” box, as well as the “Use Key/Value Store” box.
Xcode will also want to know which store identifier you want to use. In our example it’ll match the App ID’s reverse domain Bundle Identifier, but I understand that it can be something else, so that two apps with different identifiers can share the same data. I haven’t tried this though, so don’t quote me on it.
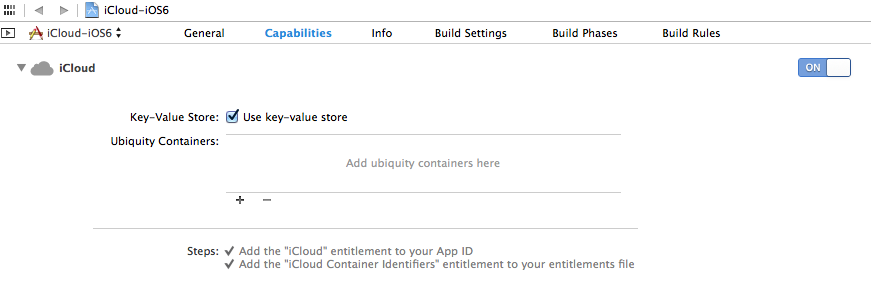
For Xcode 5 the process is slightly different, and a bit simple: click on the big blue app bar thing in the Navigator, select your target, head to the Capabilities tab and find the iCloud Section. Flick the button to “ON”, tick “Use key/value store” and you’re good to go:
Build your project, and if no spurious error messages are coming up your App is ready for iCloud!
Testing iCloud
Remember that iCloud only works on real devices, NOT on the simulator. You’ll need two devices to see if this works. One common problem is that a device is not ticked in the Provisioning Profile, in which case Xcode will throw an error when you try to deploy your app. Just something to bear in mind.
Here’s a bit of test code which will write a simple string to the cloud if it doesn’t exist. If it does, the string will be retrieved and printed. Add this to your AppDelegate.m file:
- (BOOL)application:(UIApplication *)application didFinishLaunchingWithOptions:(NSDictionary *)launchOptions
{
    // setup iCloud "user defaults"
    NSUbiquitousKeyValueStore *cloudStore = [NSUbiquitousKeyValueStore defaultStore];

    // check if there's somethin in iCloud, and if not, set something
    if ([[cloudStore stringForKey:@"testString"] length] == 0) {
        NSLog(@"Nothing in iCloud - setting a value...");
        [cloudStore setString:@"I'm live in iCloud! Woot!" forKey:@"testString"];

    } else {
        NSString *result = [cloudStore stringForKey:@"testString"];
        NSLog(@"Found something in iCloud - here it is: %@", result);

    }

    // the end

    return YES;
}
Happy iClouding!
do to store int value to iCloud