
![]() I’ve been trying to find a way to remove OSSEC on one of my Macs. Most documentation is a bit outdated and references files from yesteryear, so here’s how to do it on macOS Sierra in 2018.
I’ve been trying to find a way to remove OSSEC on one of my Macs. Most documentation is a bit outdated and references files from yesteryear, so here’s how to do it on macOS Sierra in 2018.
These instructions were written with OSSEC 2.8 in mind. I’m not familiar with later versions.
Removing the three system users
The OSSEC Agent creates three system users that come up when your Mac is started. They’re called ossec, ossecm and ossecr. OSSEC uses these to run its various scrips and services.
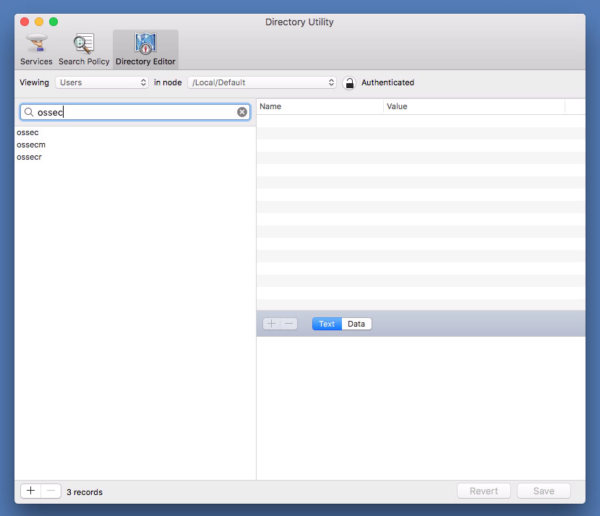
To remove them on macOS, head over to System/Library/CoreServices/Applications and start the Directory Utility app. Unlock the little icon at the bottom left with your password to make changes (that lock icon only comes up when you click on Services or Search Policy).
Select the Directory Editor and search for “ossec”. You should find the three system users. Select them and remove them using the little minus icon at the bottom left.
Removing files
We’ll have to remove all files from /var/ossec and the configuration file from /etc/ossec-init.conf.
Since OSSEC was likely installed from source, there are no handy graphic utilities to help us. Instead execute the following commands from the command line:
sudo rm /var/ossec

sudo rm /etc/ossec-init.conf
Removing System Daemons
While we find daemons in /etc/init.d on Linux distributions, they’re stored in .plist files in both /Library/LaunchAgents and /Library/LaunchDaemons. In the latter we find one like this:
com.yourname.yourserver.ossec-control.plist
The exact name will depend on your user name and machine name. Remove this file, then restart your system.
1 thought on “How to remove OSSEC Agent on macOS Sierra”