Before we start we need to create a new file called Localizable.strings (from File – New – Resource – Strings File). Xcode needs one file per language. Next we create localized copies of our files:

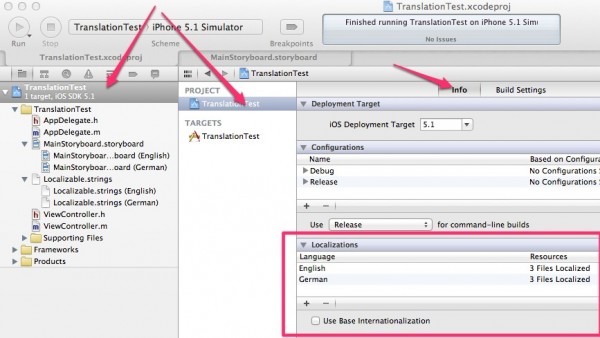
- head over to your Project Editor (the big blue icon)
- select it again under Project (another blue icon)
- make sure INFO is selected
- find the Localizations box
- hit the + button to add a language of your choice
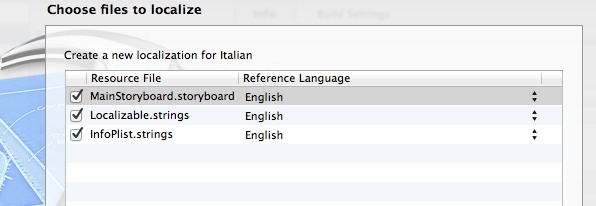
Xcode will bring up a dialogue box and suggest files it can translate. Leave them all ticked (or uncheck the ones you don’t need) and hit finish.

Notice that Xcode has now created the translated files underneath the original files: Storyboards and Localizable.strings:

Technically with two languages there are only two files – the first one is just a heading to clarify. Prior to 4.4 Xcode would create a separate folder per language (like en.lproj) and add the files there but that’s not the case anymore.
Storyboard files can be translated “by hand”, whereas string files can be translated using key/value pairs in your Localizable.strings file. Here’s an example: to print the text in a label, instead of
self.myLabel.text = @"English Text";
we’d use the following:
self.myLabel.text = NSLocalizedString(@"myText", nil);
In a Localizable.strings file for English we define
"myText" = "English Text";
and Xcode (or rather the iPhone) will print out this text when our phone is set to English (under Settings – General – International – Language). In the Localizable.strings file for any other language we can define translations with the same key, for example
"myText" = "Deutscher Text";
This would be displayed when the iPhone is set to German.
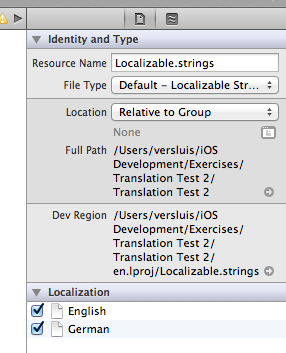
You can add other translations to files such as Localizable.strings simply by selecting the file on the left, and then adding a translation on the right hand side under “Localizations” in the File Inspector:


NOTE:
At times the simulator may not translate items from your Localizable.strings file. You may think you’re going mad – but before checking in with your therapist, try the following:
You guys should check out this localization tool: https://poeditor.com. I’m trying to show it to all the developers I encounter because to me it’s really easy to use and very efficient. It has a nice translation memory that helps a lot and also the API is very helpful.