 I’ve been shifting some things around and came across several very large WordPress databases for a few projects I was hosting. The largest was 1.3GB or 317MB compressed (!) which obviously poses a problem. Most sites – even those of frequent bloggers – amount to well under 2MB when compressed, but Multi Site or BuddyPress databases can get large quick.
To extract a database from a WordPress site, I’ve always relied on the superb WP DB Backup by Austin Matzko but even that timed out after 170MB.
In this article I’ll talk you through how we can handle this. I’m assuming here that a simple phpMyAdmin export/import isn’t working for you anymore. This is by all means not the only way to go about this task.
Step 1: Exporting the database
Very much dependent on the size of your database you have several options on how to extract those. Most of these work fine for databases under 50MB:
- phpMyadmin, a web interface usually provided by your host
- WP DB Backup by Austin Matzko, a plugin for WordPress
- mysqldump, a Linux shell command
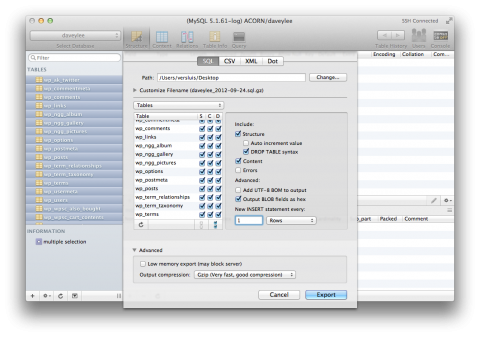
But because my database is really large I’m using Sequel Pro, a free Mac client which works a bit like phpMyAdmin but doesn’t time out. I know of nothing similar for the PC at the time of writing – if you do, please post a comment.
Connect Sequel Pro to your source database server, select the database on the top, select all tables and right-click to bring up the EXPORT option. Check out the advanced options where you can set compression options and – VERY IMPORTANT – set the “New INSERT Option” to every 1 row. This is the equivalent of using no extended inserts MySQL.

Hit export and grab a coffee – this could take a while. Sequel Pro will write an uncompressed .sql file to your local hard drive.
Feel free to use any of the other tools mentioned above, all that counts is that you have a full .sql (or compressed variation thereof) on your local machine.
Step 2: Transferring your data to the new host
The next thing we need to do is somehow bring this .sql file over to the new destination server. If this is your local system for testing, then the hard part is done already. But if you’re transferring to a new remote host then you’ll need to undertake this extra step.
Needless to say, you’ll have to setup a new database on your destination server too – we’re not going to cover that in this article though.
In an ideal world, you’d just access phpMyAdmin, select your new empty database and hit “import”. Then you’d select your file, it uploads and populates your database. Sadly this only works when your file is small enough to survive a web upload without timeouts and when your destination server allows MySQL uploads larger than 2MB. In other words: this is not an option for us.
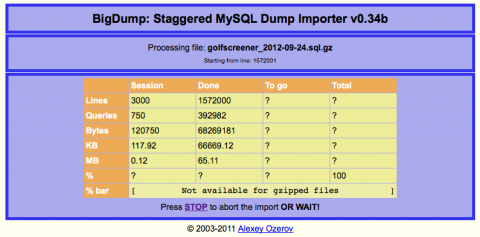
Lucky for us Alexey Ozerov has written one of the biggest MySQL lifesaver tools I know of: a small free PHP script called BigDump. It staggers the import Give this man $20 today!
First you’ll have to transfer your .sql file to the destination server via FTP. Next you’ll have to configure bigdump.php as it needs to know your host, database, user name and password. You’ll also need to tell it the file name of your .sql file. BigDump will work with .sql and zipped vairations (.bz and .gz).
Step 3: Importing to your new database
Next you’ll have to call BigDump via http://yourdomain.com/subdir/bigdump.php. If you’ve configured it correctly it will give you one option (Start Importing) and show you the subsequent progress. Refill your coffee as this will take some time. If your file is not zipped (i.e. straight .sql) you’ll even see a progress bar.

Just make sure you leave your browser window alone – do not navigate away from this page! You can do other things in other tabs… just don’t disrupt the BigDump tab.
Step 4: Happiness
If you’re like me you don’t like disruptions to your sites – I’ve chosen to populate the new database while the site’s wp-config.php file was still pointing to the old database server. Once your import has finished, all that remains to do is tweak the wp-config.php file to look at the new server/new database and the job’s a good’un.
Hope this article helps you move those huge databases without breaking a sweat 😉
PS: don’t forget to donate to Sequel Pro and BigDump – the developers deserve it!
Further Reading
- download Sequel Pro for Mac
- download BigDump
- Sarah’s article on very large databases at WPMU

Thanks Jordi, awesome tip – I was always wondering if there’s a similar tool on Windows. I’ll check it out – thanks for sharing!
Sequel pro has import as well under the File menu. So if your hosts gives you the permission, then you can do a direct import.
great topic
but i think the best way is using config.php
Please elaborate what you mean by config.php.
Hi
Thank you for this great tip but I couldn’t use it because I couldn’t find where my database located so I can not fill the textbox called host. Would you be so kind to help me how I can find the location of it. to access the database i link to http://216.14.208.9/phpMyAdmin but when I write that links gives me that error
Unable to connect to host http://216.14.208.9/phpMyAdmin, or the request timed out.
Be sure that the address is correct and that you have the necessary privileges, or try increasing the connection timeout (currently 60 seconds).
MySQL said: Unknown MySQL server host ‘http://216.14.208.9/phpMyAdmin’ (0)
Thanks in advance
tolga