
![]() Not only is Xcode an excellent IDE for iOS and macOS apps in both Swift and Objective-C; it does just as fine a job for regular C and C++ code. This includes all the features we know and love, such as code completion, version control, and all the rest of it.
Not only is Xcode an excellent IDE for iOS and macOS apps in both Swift and Objective-C; it does just as fine a job for regular C and C++ code. This includes all the features we know and love, such as code completion, version control, and all the rest of it.
Let’s see how to use Xcode 8.3 for C and C++ development.
A Chinese Version of this article can be found here.
Starting a new C Project
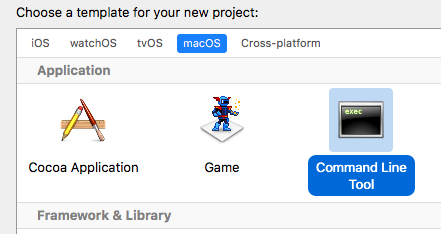
Even the shortest programmes you’ll ever write with Xcode are a project. Everything’s a project in Xcode. Start a new one under File – New Project. Under the macOS tab, find the Command Line Tool and hit next.
On older versions of Xcode the grouping at the top was a little different, and the template may have been called Command Line Utility, but the principles were exactly the same.
On the next screen, choose C or C++ instead of Objective-C or Swift from the drop down to pick your language. You’re also invited to give your project a title and a location where you’d like it to live on your hard drive, and if you’d like to setup a local git repo for it.
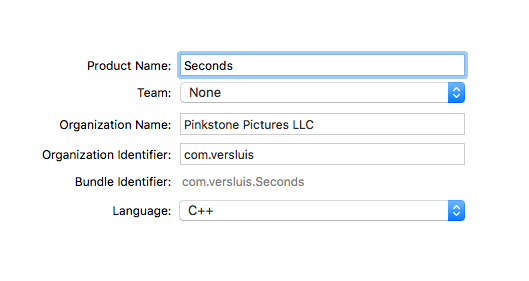
Leave all the other fields at their default and choose next to begin your coding session.
Compiling and Testing your Project
Xcode will create a Hello World app by default with only a main.c or main.cpp routine. If you hit the big Play Button at the top left, Xcode will go ahead and build and run your project. Any output from your code can be seen in the console (bottom pane, right hand side, it will automatically open).
However, any input you’d like the user to provide to your app can’t be provided because by default, we’re not opening a Terminal Session. Let’s do that next.
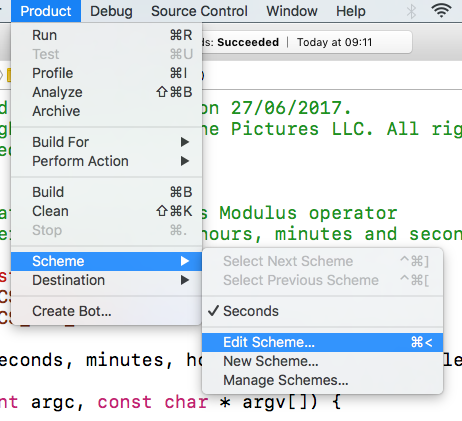
Under Product, choose Scheme – Edit Scheme. By default the Run scheme should be selected (and if it isn’t, select it).
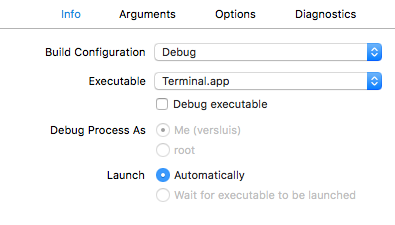
Under Info, choose the Terminal app in the Executable drop down. You’ll have to navigate there manually, it’s installed in /Applications/Utilities/Terminal.app. Untick the Debug Executable check box while you’re here.
This will take care of opening Terminal when we run our app from Xcode. Now choose the Arguments tab add the following into the Arguments Passed On Launch field:
${BUILT_PRODUCTS_DIR}/${FULL_PRODUCT_NAME}
This will ensure that our app is launched after Terminal is launched so that users can provide keyboard input for our app.
Try to run your app now and see if it works. In our case it still just prints Hello World of course, but if you add something like scanf you will be able to enter values and use them inside your app. Don’t forget to close the Terminal window when you’re done running you app, Xcode can’t do that for you.
Building you Project
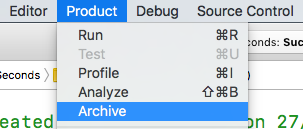
When it’s time to compile and distribute your project, Xcode can be of help here too. It’s mainly designed for building and code-signing apps that shall live on the App Store, but Xcode can also simply compile and not code-sign your project.
To do that, head over to Product – Archive.
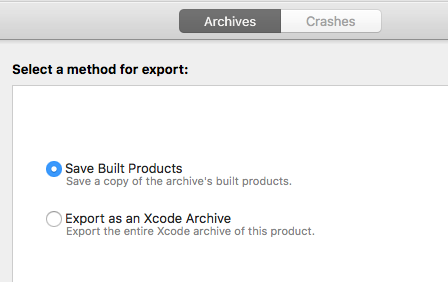
This will compile and link your project, but it will not create a distributable file yet. For that you need to select one of the archives from the list, then select export on the right hand side. In the next window that appears, choose Save Built Products, then select a place on your hard drive.
The latter is the equivalent of changing into your project’s folder and compiling with
gcc -o YourProject main.c
for a C project, or with
g++ -o YourProject main.c
for a C++ project from the command line. You can still do that of course. If you et Xcode do it, it will create a new folder inside another folder with your compiled and ready-to-run executable in it.
That’s it! Have fun coding C and C++ wth Xcode!
This was very helpful! Thanks..
<3