
I love my old MacBook Pro. It does everything I want for a portable coding, writing and occasional editing device. I’ve had it since 2011 and it’s still going strong.
Apple however doesn’t want to suport it anymore. I’m stuck with macOS High Sierra, without an option to upgrade without shadowy patches. Even if I could keep up with Mojave and beyond, the hardware might just not be fast enough anymore to give me an enjoyable experience.
So I thought, perhaps I’ll put in a new hard drive that I had in another old laptop and install Windows 10 on it. Apple’s recommended way is to do all this from macOS, using their own Bootcamp setup. However, being the hacker that I am, I thought perhaps I’ll try the “Windows Only” experience.
I did this in two live streams the other night, and continued the process over the following days – and now I’ve got a (more or less working) Windows 10 installation on my MacBook Pro (early 2011 Edition). I thought I’d take some notes on how I did this step by step, and give you my opinions if this was an adventure worth undertaking.
What we need
For this experiemnt, we need the following ingredients:
- a new hard disk, preferrably an SSD
- a bootable Windows Installation Disk ur USB Sick (can be created with the Windows Media Creation Tool)
- a Mac with an Ethernet Port
- and a wired Internet Ethernet Connection (I’ll tell you why later on)
I started by swapping out an old hard disk from another laptop I had lying around, so see if this experiment would work in principle. I didn’t want to touch my current installation of High Sierra. In case my Windows 10 Folly wasn’t going to be successful, I would have something to go back to in a jiffy.
The old hard disk came from a Samsung Q330 laptop, on which I had CentOS 7 installed. To my complete surprise, CentOS 7 booted just fine on the Mac hardware. Even those awkward “special” keys worked out of the box, such as volume, display and keyboard dimming. I was very impressed, and felt almost sorry to overwrite CentOS with Windows. But hey, that’s the experiment. It’s just good to know that I have another OS to try some day.
Booting from CD or USB
With a (more or less) fresh hard disk in place in my Mac, my first hurdle was to figure out how to make the Mac boot from anything other than the internal hard drive. On PC hardware, I’d usually go into the BIOS and tweak the boot sequence, making sure that the CD drive comes before the hard disk. On a Mac, we have no user accessible BIOS.
Thanks to Steve Davies though, who was watching the stream, he found out that by holding the C key while booting, Macs will indeed boot from CD. It worked great! Windows gave me the message to “press any key to boot from CD”, which starts the installation process.
If you’re booting into a USB stick instead of a DVD, hold down the ALT/OPTION key while you’re starting up your Mac instead. I’ve not been able to try this myself, but apparently that’s how it’s done. Good to know for next time.
And speaking of booting differently, holding down CMD+ALT+R will start the Mac in Internet Recovery Mode. That’s handy if you ever want to go back to macOS, but don’t have access to any installation media. Thought I’d mention it, in case one of us needs to do this.
Installing Windows – always fun!
Aside from one random hiccup that made the installer freeze the first time, Windows finished the installation without further hitches the second time around. There were a few more privacy related questions than I had remembered from all my years with Windows installations, but once properly answered, we had the regular blue Windows desktop looking at us.
The bigger problem was that none of the Mac specific hardware was working properly. You’d think with something so open and supportive as Windows would simply include the necessary and openly available drivers for Apple hardware in its inventory. But no: Windows simply tries its best to find a generic driver for things like the trackpad, keyboard, graphics card and so forth. Some of these things work, but they’re not optimised.
That’s where the Bootcamp drivers come in handy. Bootcamp is Apple’s way of supporting their own hardware on Windows. It once was a big selling feature for converting users who came from Windows. It lets you boot the Mac into Windows mode (from macOS), and go back to macOS at any time with a simple restart (from Windows). There’s a lot of trickery going on under the hood, most of which I didn’t need for my project, but the Bootcamp Drivers do support the hardware we need under Windows.
The trick is to get ahold of them without involving macOS.
Enter Brigadier
The wonderful Tim Sutton wrote a script that allows us to download the Bootcamp drivers for a specific Mac from the command line under Windows. It’s specifically designed to extract the drivers we need, without having to start the Apple-made installer from macOS.
Alternatively we can do a search on Apple’s Support Website and may end up finding something like this link to Bootcamp v5.1.5769, but when I tried installing that, the tool told me that it’s just not made for my MacBook model. Apple’s website isn’t exactly forthcoming on how to obtain versions of their software for vintage hardware.
With Tim’s Brigadier script, you download one small file, run it from the Windows command line, specify what model Mac you’d like drivers for, and it does the rest. Specifying no parameters will download the driver version that were intended for the Mac you’re using. It’s all explained on his GitHub Repository.
After downloading the latest brigadier.exe file from the Github Repository’s Releases section, we need to open a Command Line Prompt with Admin privileges. That’s done by searching for “cmd” in Windows, then right-clicking on the Command Prompt App that comes up and selecting “Run as Adminstator”.
Next we’ll navigate to the folder that contains the Brigadier.exe file and simply run it with “brigadier”. Calling brigadier –help will bring up a list of additional parameters we can specify. Over the next few minutes, we’ll see a list similar to this one:
 brigadier

 Using Mac model: MacBookPro8,1.
 Model supported in package distribution file at http://swcdn.apple.com/content/downloads/05/56/031-02368/a0h5nceqb9kjzzs3eus566vngukimq9j86/031-02368.English.dist.
 Distribution 031-02368 supports the following models: MacBook2,1, MacBook3,1, MacBook4,1, MacBook5,1, MacBook5,2, MacBook5,3, MacBook6,1, MacBook7,1, MacBookAir1,1, MacBookAir2,1, MacBookAir3,1, MacBookAir3,2, MacBookPro2,1, MacBookPro2,2, MacBookPro3,1, MacBookPro4,1, MacBookPro5,1, MacBookPro5,2, MacBookPro5,3, MacBookPro5,4, MacBookPro5,5, MacBookPro6,1, MacBookPro6,2, MacBookPro7,1, MacBookPro8,1, MacBookPro8,2, MacBookPro8,3, MacPro1,1, MacPro2,1, MacPro3,1, MacPro4,1, MacPro5,1, Macmini2,1, Macmini3,1, Macmini4,1, iMac5,1, iMac6,1, iMac7,1, iMac8,1, iMac9,1, iMac11,1, iMac11,2, iMac11,3, iMac12,1, iMac12,2.
 Model supported in package distribution file at http://swcdn.apple.com/content/downloads/53/19/031-0787/e59hg9xe761b8zzeyrffkjo2i2zuogqd9g/031-0787.English.dist.
 Distribution 031-0787 supports the following models: MacBookAir4,1, MacBookAir4,2, MacBookAir5,1, MacBookAir5,2, MacBookPro6,1, MacBookPro6,2, MacBookPro8,1, MacBookPro8,2, MacBookPro8,3, MacBookPro9,1, MacBookPro9,2, MacPro4,1, MacPro5,1, Macmini5,1, Macmini5,2, Macmini5,3, Macmini6,1, Macmini6,2, iMac11,3, iMac12,1, iMac12,2, iMac13,1, iMac13,2, iMac13,3.
 Model supported in package distribution file at http://swcdn.apple.com/content/downloads/41/25/031-11269/hpi4khg5mrvy75pcamao1thdrwm3qetgk0/BootCampESD.dst/031-11269.English.dist.
 Distribution 031-11269 supports the following models: MacBook2,1, MacBook3,1, MacBook4,1, MacBook5,1, MacBook5,2, MacBook5,3, MacBook6,1, MacBook7,1, MacBookAir1,1, MacBookAir2,1, MacBookAir3,1, MacBookAir3,2, MacBookPro2,1, MacBookPro2,2, MacBookPro3,1, MacBookPro4,1, MacBookPro5,1, MacBookPro5,2, MacBookPro5,3, MacBookPro5,4, MacBookPro5,5, MacBookPro6,1, MacBookPro6,2, MacBookPro7,1, MacBookPro8,1, MacBookPro8,2, MacBookPro8,3, MacPro1,1, MacPro2,1, MacPro3,1, MacPro4,1, MacPro5,1, Macmini2,1, Macmini3,1, Macmini4,1, iMac5,1, iMac6,1, iMac7,1, iMac8,1, iMac9,1, iMac11,1, iMac11,2, iMac11,3, iMac12,1, iMac12,2.
 There is more than one ESD product available for this model:
 031-02368: PostDate 2014-05-14 19:32:12
 031-0787: PostDate 2014-02-11 21:35:32
 031-11269: PostDate 2015-02-09 18:42:38
 Selecting 031-11269 as it's the most recently posted.
 Final output path C:\Users\versluis\Desktop\BootCamp-031-11269 already exists, removing it…
 Making directory C:\Users\versluis\Desktop\BootCamp-031-11269..
 Fetching Boot Camp product at URL http://swcdn.apple.com/content/downloads/41/25/031-11269/hpi4khg5mrvy75pcamao1thdrwm3qetgk0/BootCampESD.pkg.
What’s happened here is that Brigadier contacts Apple’s website and then downloads the correct Bootcamp installer and all drivers for the current Mac. In my case, that’s a “MacBookPro8,1”, which is Apple’s unique hardware identifier for my particular model. This probably won’t give me the latest Bootcamp installer package, but it will give me the ones that were last intended by Apple for my hardware.
Apple do maintain a list of MacBook models here though, so if you’d like to try another version for a later hardware, feel free to do so. You can call Brigadier like this (replacing the specifier with your desired one).
brigadier -m MacBookPro12,1
Once finished, we’ll find a folder called BootCamp in the same directory in which we ran Brigadier, appended by the specific release (like BootCamp-031-0069).
Installing macOS Drivers in Windows
Our BootCamp directory will have a subdirectory, in which we find a Setup.exe file, as well as another subdirectory with various other .exe files that will install single components. We can either run the former, which will install all drivers we need for the whole system, or we can install individual drivers at our leisure. The former method will create a small task bar utility for conveinient configuration options, like trackpad and keyboard preferences.
Sadly though, this utility was written for Windows 7, and hence it won’t install without a hitch on WIndows 10. Later versions of BootCamp are probably working fine with Windows 10 on newer hardware, but I always got an error message when I tried to run those on my hardware. Thankfully Windows allowed me to install this utility in Compatibility Mode (using right-click – Properties – Compatibility Mode on the Setup.exe file).
After a restart, most of my hardware was now working fine.
What’s Windows 10 like on a MacBook Pro 2011?
The big question I had was: how would my old hardware perform with Windows 10? Not so much in regards to speed, but rather in terms of usability. Would I be able to connect to the internet, get an adequate display resolution, would the trackpad work, and would the keyboard acknowledge the addtional function keys, including volume and backlight?
Well here’s where things got tricky. The observant reader will have probably figured out that in order to download the relevant BootCamp drivers to make all this Brigadier magic happen, one must first be connected to the internet. Alternatively, one must download all this on a separate Windows computer and transfer the files via USB stick. That was the first hurdle! Let me explain:
My macBook did not recognise a wireless driver after Windows installed. The only thing it knew was my Ethernet port, and thankfully I had a wired connection at hand. This was my luck, because the Mac did not recognise my USB stick without at least one quick connection to the Microsoft servers. Keep that in mind when you undertake such an adventure.
You may have better luck that I had of course. The one thing that worked super reliably for me here was my integrated DVD drive, the one I hadn’t used for a while. Had I not had a wired connection, and the USB stick wasn’t recognised, burning the Birgadier drivers onto a disk would have saved the day here.
Trackpad Issues
Once my Bootcamp bits and bobs were installed, I had some trouble getting used to how the trackpad was responding under Windows. I’ve always loved how responsive the hardware was, let alone gesture support. Even if the latter wasn’t going to be available, two-finger tapping and scrolling is a must to navigate anything. Well… this thing just behaves different under Windows.
There are some options to adjust In the Bootcamp helper tool, accessible via the taskbar (bottom right).
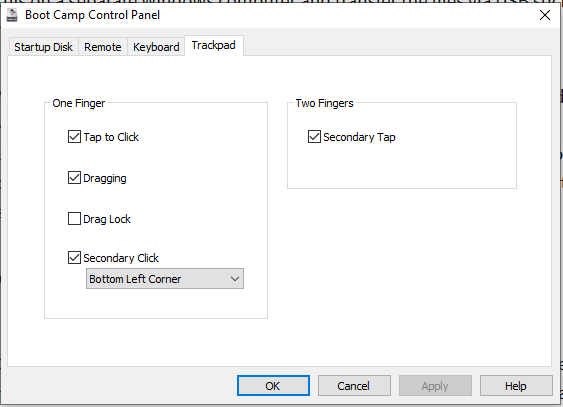
Although support for tap-to-click is there, clicking and dragging at the same time is awkward to say the least. This was working flawlessly under macOS. The Windows implantation is just plain clunky. We have an option to specify which “area” of the trackpad shall be used to acknowledge with which finger you’re click-holding (lower left of lower right), and I’ve tried them bot, but neither option is optimal. You have to awkwardly make sure where your finger is when you mark a portion of text, or you have to drag with the same finger you’re currently clicking with. Terrible is probably a good word to describe the user experience.
On a positive note, right-clicking works just by tapping with two fingers, just like I was used to it from macOS.
Keyboard issues
Most keys work fine out of the box, aside from the way the # key is mapped on the macOS keyboard. Mine has a UK layout, and Mac users are used to pressing ALT+3 to bring this symbol up (no matter if you call it pound or hash). Under Windows, it appears to be next to the return key, on the backslash button. Double-quotes are now on SHIFT+2, and the @ sign is now on the SHIFT+’ (single-quote) button.
All this sounds like it should be rectifiable with a different keyboard layout other than the UK version I was using, but I’ve not tried it yet. It’s not a major issue for me – I’m working across so many keyboards and layouts, and I’m used to typing on keys that have different symbols on them. Before I forget, the CMD key acts as the Windows key, and CMD and CTRL are what they say they are. Remember the implications for copying and pasting 😉
The bigger problem are those “special keys” with which we can control the Mac hardware. Display backlight, keyboard backlight and volume. The Mac drivers should take care of those, and the good news is that most of them work fine! Volume keys and keyboard backlight behaves just like it does under macOS. Hurra!
The Display Brightness however does not. Both of keys lower the brightness, until the display is eventually switched off. There’s no way to increase the brightness with keys. It can still be done from the Windows sidebar, but you may not be able to posotion your cursor there once the display is pitch black. Just be careful, and only adjust the brightness up from the Windows settings instead.
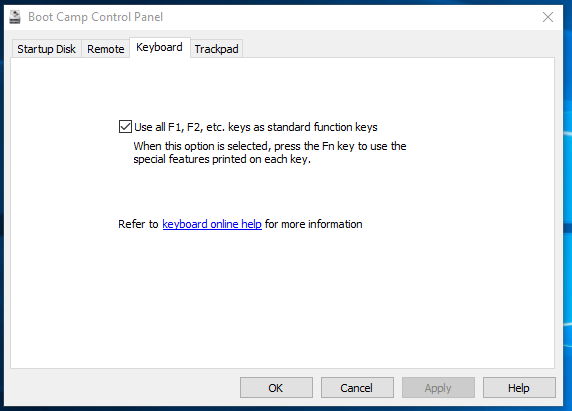
To make sure you don’t accidentally press any of those keys, enable the FN button in the BootCamp Control Panel. This means that the upper row of keys acts as regular F1-F12 keys, and you’ll need to press Fn in addition to utilise the special options.
In other good news, the Audio, WiFi and Display drivers appear to be working fine. I could run my native 1280×800 display in exactly that resolution, and things looked just fine. The speakers were working too, and eventually so did the USB ports (for transferring data that is).
The only thing I haven’t tested is the Thunderbolt Port, so I’m not sure if I can connect an external display, like the 27″ screen I have.
So what’s the verdict?
Do I recommend running Windows 10 on a MacBook Pro from 2011? It’s a tough call. I should mention that although it’s an 8 year old machine, I do have the 2.8 GHz Intel i7 processor and 16GB of RAM. Considering how slick the performance under High Sierra was, I had expected something at least similar if not better under Windows 10.
Sadly it just didn’t feel like an upgrade, more like a severe downgrade.
Overall system performance felt sluggish. Letters that I typed only appeared half a second later on the screen, sometimes in a series of several that were stored in the keyboard buffer. The trackpad implementation is terrible, and gone are the days of two-finger scrolling through a web page elegantly. Especially for typing, I sorely missed the excellent type correction tools I was so used to from macOS. Even in Firefox, which has its own implementation of correction tools, it felt just cheap and nasty.
Granted, the hardware drivers were originally made for Windows 7, and I’m using them under Windows 10, so perhaps better performance could be achieved if Apple had been kind enough to provide an adequate version. But why would they? Apple hardware goes out of style 12 months after they introduce it, and it’s not necessarily Microsoft’s responsibility to make sure that exotic vintage hardware works on their OS. I appreciate that.
At a push, navigating with a regular mouse might improve the user experience just a little bit, but this being a laptop and all, a surface on which to use one may just not always be feasible. An SSD instead of an old spinning drive does certainly improve things, and believe me I’ve tried. I’ve invested $30 into a new one specifically for this purpose – but it still wasn’t something I could see myself using.
Although you can probably get by, I didn’t feel that running Windows 10 on my MacBook was an improvement over High Sierra. Quite the opposite. It feels like a downgrade across the board. After several weeks of testing, I decided to put my old SSD back in and keep using it as it was intended to be used.
One day I may try to run CentOS on it, but until that day comes, I have a larger choice of apps available under macOS, however outdated they may be.
I believe the Brigadier drivers access the Apple servers, but the difference is that you can try a slight later version of what Apple offer. Plus it’s easy to download using Brigadier, I had a hard time finding the latest available package on the Apple site. If you don’t specify the version, Brigadier will download what was intended for your model. Try installing that package in compatibility mode and see it that works – it did the trick for me.
Hi! I just followed this to install Windows 7, not 10 to play CS 1.6. I have to say that even boot from USB it’s possible I couldn’t use it with RUFUS and Win 7. I had to use the CD. I had Mohave on the MBP2011 thanks to dosdude1, but I downgraded to High Sierra to be able to use the old version Boot Camp that make the partition ready. After that Brigadier gave me and SSL TSL v1 error that I couldn’t figure it out, but what I done is to use the Driver Pack Solution Offline that I already had in a USB disk and that solved almost everything because it doesn’t install the bootcamp drivers for the mouse, but it worked for CS because I use an external mouse. THANKS!
Thanks for sharing, Maik!