
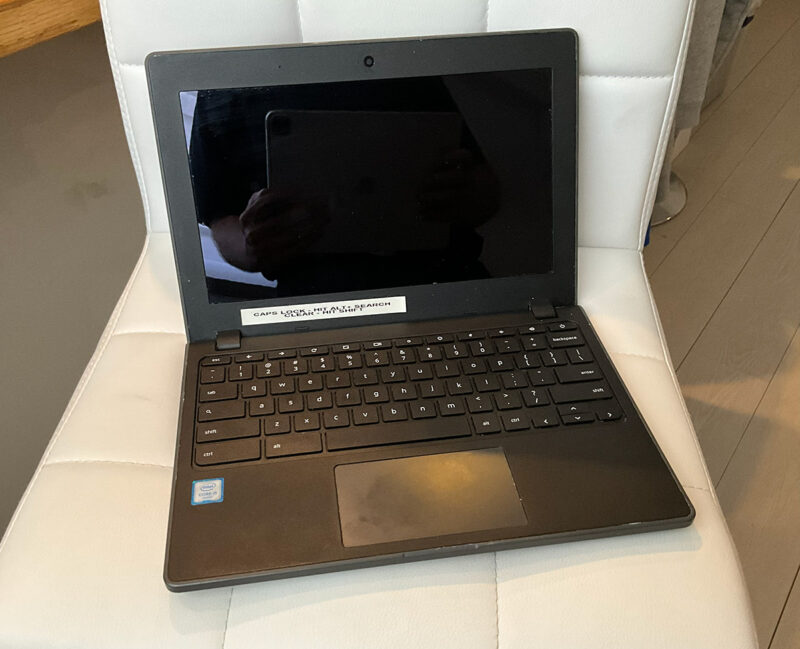
This is the main course to go with my battery-revival article about the same machine — read that one for the story of why this laptop wouldn’t even switch on at first. This piece covers the interesting part: turning a 2017 education Chromebook into an ordinary UEFI laptop running Fedora 44 KDE.
Why bother?
My wife’s old Acer Chromebook C771T came home from a former employer years ago and went straight into a cupboard. On paper it’s a lovely little machine: 11.6″ IPS touchscreen, MIL-STD ruggedisation, a spill-resistant keyboard with actual drainage channels, and — in this top trim — a proper Intel Core i5-6200U with a fan and heatpipe. It was the first Chromebook line built on 6th-gen Intel silicon.
But it’s also years past its ChromeOS auto-update expiration date, meaning even a perfectly working unit is frozen on an unsupported OS. Google’s answer is e-waste. Mine is the C128 test: if a Commodore 128 from forty-odd years ago still passes the “just add electricity” standard, a 2017 machine with an i5 in it certainly should. The route: replace the firmware entirely with MrChromebox’s UEFI coreboot build, then install Fedora like on any other laptop.
Step 0: Know your board name
Chromebooks have two identities: the retail model (C771T) and the ChromeOS board name, which is what all the firmware tooling cares about. The C771/C771T is LARS — a Skylake board shared with the Acer Chromebook 14 for Work (CP5-471), and fully supported by MrChromebox with a UEFI Full ROM.
You can read the board name straight off the machine: boot into Recovery Mode (Esc + Refresh + Power) and the bottom of the screen shows the full hardware ID — mine read LARS E5K-U44-.... The first word is the one that matters.
Step 1: Check for enterprise enrollment before investing your evening
If your Chromebook ever belonged to a school or company, it may be enterprise enrolled — and enrolled devices force re-enrollment after every recovery and block Developer Mode entirely, which stops this entire project at the gate. Warning signs: asset stickers, keyboard-shortcut labels from an IT department, any “managed by” notices.
The good news: if the organisation properly deprovisioned the device when it left their fleet (as they should, and as they did with ours), it’s released. You’ll know for certain after recovery — a normal consumer “Welcome to your Chromebook” screen means you’re clear; a “managed by [organisation]” screen means you need to ask the old owner’s IT to release it.
Step 2: Recover ChromeOS (temporarily)
The MrChromebox firmware script runs from inside a booted ChromeOS, so if your machine won’t boot (mine wouldn’t — see the battery article), you first bring ChromeOS back:
- On another computer, install the Chromebook Recovery Utility (Chrome extension).
- Since the target machine can’t report its model, pick it manually — Acer → Chromebook 11 (C771/C771T) — or enter the board name.
- Write the image to a USB stick, feed it to the recovery screen, wait.
Yes, it’s mildly absurd to reinstall an OS purely to demolish it. Think of it as scaffolding.
Step 3: Developer Mode
From the recovery screen: Ctrl+D, confirm, and let it wipe (five–ten minutes). From now on every boot shows a white “OS verification is OFF” screen — Ctrl+D skips it.
After the wipe, step through setup only as far as connecting to WiFi (the firmware script needs internet). Don’t sign in — there’s no need, and it all gets erased anyway.
Step 4: The write-protect screw
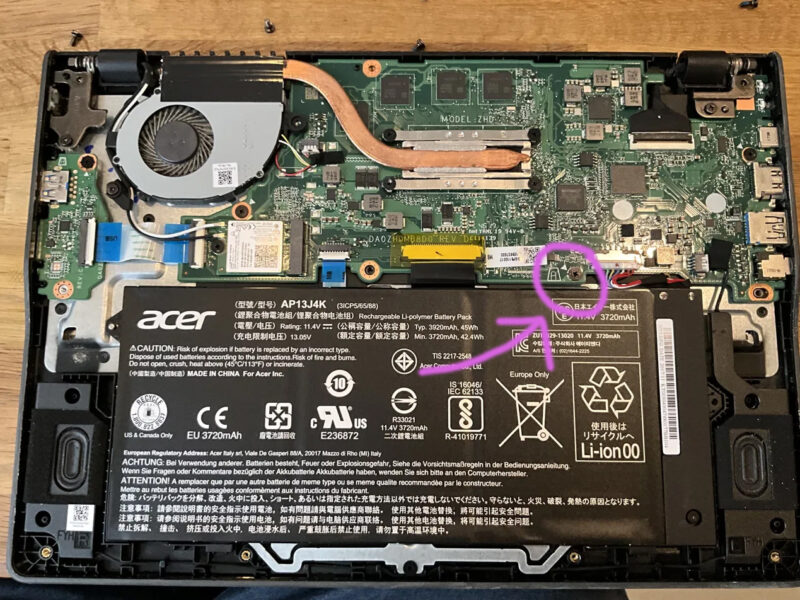
Full-ROM flashing requires disabling the hardware write-protect, which on LARS is a screw on the motherboard whose head bridges two copper pads, holding the flash chip’s WP pin asserted. Remove the screw, break the circuit, WP disabled. You leave it out permanently — there’s no downside, and future reflashing stays possible.
Two honest warnings from my own session:
- Opening the case: all the bottom screws, then a ring of plastic snap clips that need to be popped with a guitar pick or spudger, front corner first, hinge edge last. The cracks sound alarming; confident popping breaks fewer clips than timid prying.
- Finding the screw: it looks like an ordinary board-mounting screw. It isn’t labelled. An Acer Community thread has a moderator-annotated photo for the C771T that saved me the guesswork — and the firmware script verifies your work anyway, reporting the WP state before it offers the flash. Pull the wrong screw and nothing bad happens; the flash simply stays locked until you find the right one.
While you’re in there: disconnect the battery before touching anything, reconnect before closing up. (And read the battery label — that’s a whole other article.)
Step 5: Flash the UEFI Full ROM
Back in ChromeOS at the WiFi-connected setup screen, drop to a shell with Ctrl+Alt+F2 (F2 = the forward-arrow key), log in as chronos (no password in dev mode), and run:
cd; curl -LO mrchromebox.tech/firmware-util.sh && sudo bash firmware-util.shThe script’s status block shows your device, board name, and — the moment of truth — Fw WP: Disabled. Choose Install/Update UEFI (Full ROM) Firmware, not RW_LEGACY (that’s the halfway house that keeps ChromeOS and bolts legacy boot on the side; we want the clean break).
Say yes to the stock firmware backup — it’s ~16 MB, your undo button, and the script writes it to any USB stick or SD card it can see. Archive that file somewhere permanent afterwards, because the day you need it is the day you won’t remember which stick it’s on.
The flash itself takes about ninety seconds. The machine must not lose power during this window. Mine had no working battery at the time, so this meant a solid mains connection and no cable acrobatics. A failed flash is recoverable with a CH341A programmer and a clip, but that’s an afternoon nobody orders on purpose.
Two notes from the post-flash small print worth repeating: the first boot after flashing can take 30+ seconds of apparently dead screen while UEFI initialises its NVRAM — resist the power button. And the flash carries over your VPD (serial number and calibration data), so the machine keeps its identity.
Step 6: Install Fedora — the boring part, gloriously
Reboot and you’re greeted by a TianoCore splash instead of anything Google-branded. From here, this is an ordinary laptop:
- Boot the Fedora 44 KDE live USB (tap Esc at the splash for the boot menu).
- In the live session, take ten seconds to confirm WiFi, touchpad and touchscreen work. (They will — the C771T has an Intel WiFi card, so there’s none of the Broadcom séance my vintage MacBooks demand.)
- In Anaconda, choose the internal eMMC (
mmcblk0) and Use entire disk. The installer will warn that it’s about to delete a dozen-odd partitions — that’s ChromeOS’s baroque A/B kernel-and-rootfs layout, and none of it has any further purpose. Let it all go. - Standard Fedora layout lands: EFI partition, /boot, and one Btrfs volume with root and home subvolumes — which means the usual snapper + Btrfs Assistant recipe works here unchanged.
Post-install, the usual first moves (dnf5 syntax, as always on Fedora 44):
sudo dnf upgrade --refresh
sudo dnf install snapper btrfs-assistant
…and take a manual snapshot of the clean state before the machine accumulates history.
How it runs — and the surprise in System Settings
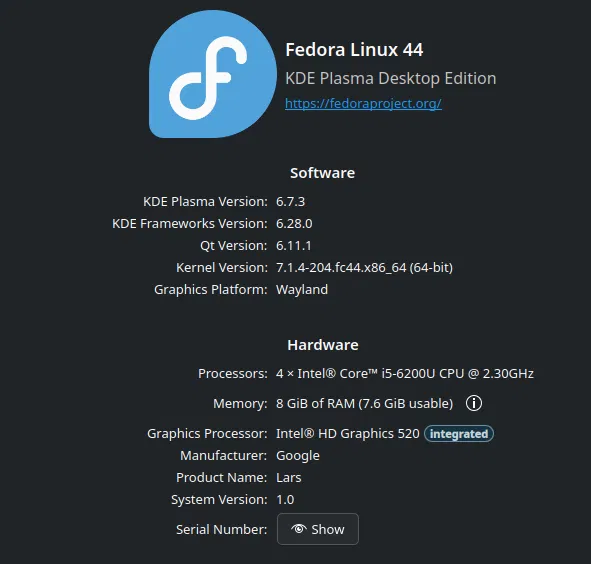
Genuinely snappy — and then the machine pulled one more rabbit out of its ruggedised hat. Every spec sheet for the C771T says 4 GB of RAM. KDE’s Info Centre says: 8 GiB. The i5 trims shipped with double the memory of the Celeron education floods, and nobody bothered to advertise it. After an evening of spec sheets underselling the hardware and overselling the firmware (see below: the backlight), I now trust nothing but the running system.
The Info Centre holds a second easter egg: Manufacturer: Google, Product Name: Lars. With coreboot in charge, the machine has dropped its Acer pseudonym entirely and introduces itself by its engineering codename. After everything we’ve been through together, it feels appropriately honest.
And the thermals deserve a paragraph of their own, because they corrected a prejudice of mine. I’ve long known Intel mobile chips as small furnaces — but that reputation was earned by 32 nm, 35 W parts like the Sandy Bridge CPUs in my 2011 MacBooks. The i5-6200U is a different animal: 14 nm Skylake at a 15 W TDP, with Speed Shift letting it sprint and nap in microseconds. Put that inside a chassis with a full fan and heatpipe designed to survive classroom abuse, and you get arguably the most over-cooled 15-watt laptop of its era. At 70% sustained load it barely gets warm. VS Code and Firefox run without complaint.
The realistic constraints that remain:
- Screen: 11.6″ at 1366×768 is cosy. Panel auto-hide (or moving the panel to a side edge — vertical pixels are the scarce resource on 16:9) buys back meaningful space.
- Keyboard: the top row is F1–F10 without labels, and the Search key sits where Caps Lock should be — both remappable in KDE’s settings. The keyboard itself is excellent to type on. No backlight, despite what the EC claims (read on).
Bonus: the phantom keyboard backlight
A parting gift for fellow log-readers. Checking for a keyboard backlight the proper way:
ls /sys/class/leds/
# chromeos::kbd_backlight  chromeos:multicolor:charging  ...
A backlight! Undocumented! Except:
echo 100 | sudo tee "/sys/class/leds/chromeos::kbd_backlight/brightness"
# ...darkness prevails
The LARS board is shared with the business-class Chromebook 14 for Work, whose upper trims did have backlit keyboards. The EC firmware advertises what the board can control — not what Acer actually soldered above it in the education trim. The register accepts the value; the current flows to pads where LEDs were never placed.
Which makes a tidy closing lesson: the spec sheet tells you what marketing sold, sysfs tells you what the firmware believes, and only the physical test tells you what’s actually there. This machine needed all three layers — the phantom backlight, the hidden extra 4 GB, the borrowed name — and it’s exactly why “just add electricity” remains the only benchmark that never lies.
Further Reading:
- Mr. Chromebox has you covered for Chromebook Firmware: https://docs.mrchromebox.tech/
- My article on how to add a $14 battery to this thing: https://wpguru.co.uk/2026/08/schrodingers-charge-the-14-battery-that-refuses-to-admit-it-exists/