
My ThinkPad P15 Gen2 is a Windows 11 machine by trade: Unreal Engine on the move, a desktop replacement for coffee shops and travel. It’s also a machine whose fans would spin for three hours at a time while Windows performed mysterious background maintenance. I wanted a second personality for it — a quiet Linux side for writing sessions with novelWriter, and a way to see what this beefy hardware could do under a different OS, and experience battery life as it was meant to be. Dual-boot it is!
I had done this before on my HP Z840, but somewhat by feel. It was done on the same M2 drive (partitioned before installing Windows), but it always felt a tad messy, even though it has been working fine for years. This time I wanted to do it properly, and it turns out dual-booting in 2026 isn’t the bootloader minefield it used to be — if you make the right structural choice before you ever touch an installer.
Here’s the whole journey, including the parts where Windows dug its heels in.
Drive strategy before anything else
The single most important decision happens before you download an ISO: where does Linux live? In order of preference:
- A separate drive entirely. Each OS gets its own EFI partition, and neither can break the other’s boot path. A Windows feature update can never stomp on GRUB, because GRUB doesn’t live anywhere Windows looks. You choose your OS with the boot menu (F12 on ThinkPads).
- Free space carved from a data drive. Second best. Still gets its own EFI partition on that drive, still self-contained.
- Sharing the Windows system drive. Works, but now you’re sharing an EFI partition, and you’ve created the one configuration where the two operating systems can interfere with each other’s ability to boot. This is what I’ve got running on my Z840. It works, but avoid it if you have any other option.
One tempting non-option: the SD card slot. My P15 has one I never use, and I briefly considered making a fast SD card the Linux system drive. Don’t. Even quick UHS-II cards fall apart on random I/O — the thousands of small scattered reads and writes an operating system performs constantly. Your NVMe does hundreds of megabytes per second of random access; an SD card often manages under five. Cards also aren’t built for the constant small writes of logs and journals, they tend to die without warning, and on many laptops the reader hangs off an internal USB controller, which makes booting from it flaky. Keep SD cards for cameras.
My P15 turned out to have three M.2 slots: Windows on a 1TB drive, a half-empty 2TB data drive, and a 4TB drive holding Dropbox and large binaries. The plan: carve 200GB from the 2TB drive. Windows had other ideas — more on that shortly.
Windows-side preparation
Three things to check before shrinking anything:
BitLocker. Open an elevated Command Prompt and run:
manage-bde -statusYou’re looking for “Conversion Status” and “Protection Status” per volume. If the target drive is encrypted, suspend protection for one reboot cycle before touching partitions:
manage-bde -protectors -disable D: -rebootcount 1Many Windows 11 machines ship with silent “Device Encryption” on the system drive only, so your data drives may well be unencrypted — mine were, on all drives, which meant I could skip this dance entirely.
Fast Startup needs to be disabled. Control Panel → Power Options → “Choose what the power buttons do” → untick “Turn on fast startup”. Fast Startup leaves NTFS in a hibernated half-state that Linux will refuse to mount cleanly. Mine was already off.
Backups. Shrinking a half-empty NTFS volume is routine, but it’s still a partition operation. Anything irreplaceable on that drive should exist somewhere else first — and remember that a cloud sync client only counts as a backup for the files actually set to sync.
When the shrink refuses: a defrag detective story
Right-click Start → Disk Management → right-click the volume → Shrink Volume. My 2TB drive, half empty, offered me a grand total of 31,749MB of shrinkage. About 32GB, from over 900GB of free space.
This is the classic tell of an immovable file parked near the end of the volume. NTFS partitions can only shrink from the tail — you can’t cut space from the middle — so one stubborn file near the end caps the whole operation, no matter how much free space sits before it. The usual suspects, in order:
- A pagefile on that volume. System Properties → Advanced → Performance Settings → Advanced → Virtual Memory. Move it to C: only, then reboot.
- System Restore shadow copies. Search “Create a restore point” → System Protection tab → if the drive shows Protection On, configure or delete.
- General end-of-disk clutter, which a free-space consolidation pass can sweep aside.
In my case the pagefile was set to “let Windows decide” (fixed), restore points were already off, and the number still wouldn’t budge. Next tool: an elevated
defrag D: /XWait — defrag? On an SSD? Here’s the fun part: the old spinning-rust defrag was about stitching scattered file fragments together so the drive head didn’t have to seek forty times per file. SSDs made that motivation extinct — every location is equally fast to reach. But /X performs free space consolidation: the mirror image. Instead of gathering file fragments, it gathers the gaps, sliding movable data toward the front of the volume so the empty space pools into one contiguous block at the back — exactly where a shrink operation needs it. Same command, completely inverted purpose: defrag survives on SSDs not as a speed tool but as a demolition crew clearing space for partition surgery.
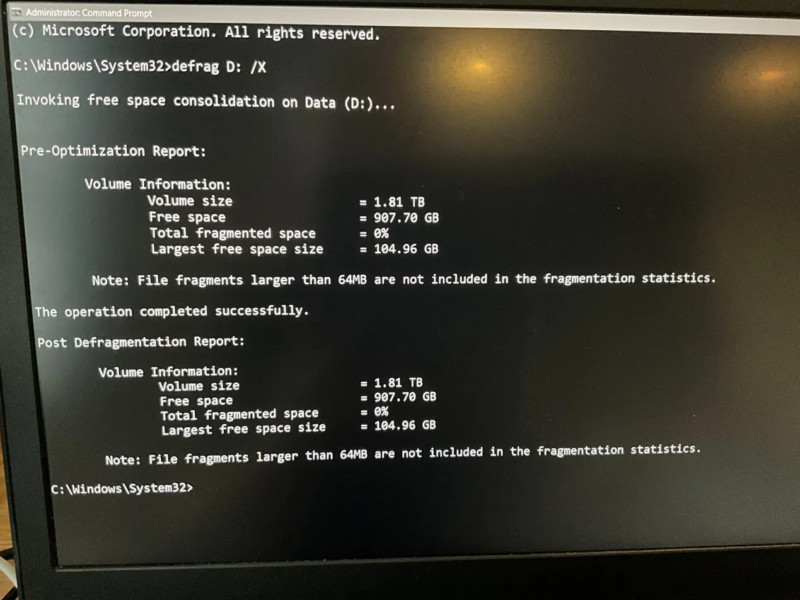
The report showed it worked, sort of: largest contiguous free block, 104.96GB. But Disk Management still offered only 32GB — meaning the immovable object wasn’t inside the free space, it was pinned near the very end of the volume. Certain NTFS metadata structures ($MFT reserved zone and friends) are placed deep into the volume at format time and cannot be relocated by any consolidation pass. A load-bearing wall in the room you’re trying to shrink.
You can evict these with third-party partition tools, but that’s more risk than a dual-boot experiment justifies. If you want to know exactly which file is blocking you, Windows will tell you — in the most obscure place imaginable: Event Viewer → Windows Logs → Application, filter for source “defrag” right after a limited shrink attempt.
My solution was simpler: I asked the 4TB drive instead, and it cheerfully offered a full terabyte. Different format history, different metadata placement luck. I took 200GB off it and moved on with my life. Know when to pivot rather than fight.
Whichever drive yields, the result you want in Disk Management is a black Unallocated block. Don’t format it, don’t assign a letter — leave it raw. That’s exactly what the Fedora installer wants to see.
Verify your install media — no, really
I had a Fedora 44 KDE live stick that had already performed two flawless installations. Out of habit more than expectation, I chose “Test this media” at boot. It failed at 4.8%. It happened so fast, and the writing was so small, I almost missed it.
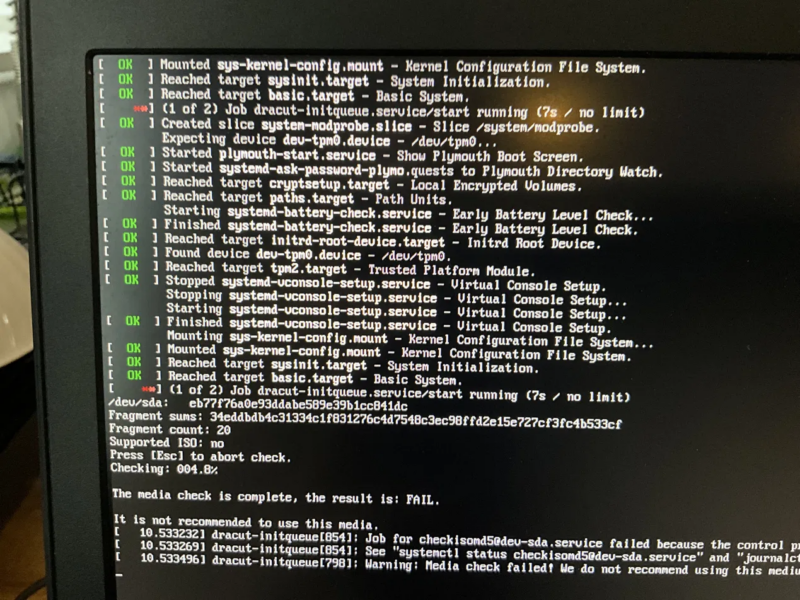
The check reads the entire ISO from the stick and compares checksums against values embedded at write time. A FAIL means at least one block has changed since the stick was written. USB flash degrades gradually — a stick that’s been written and booted many times develops marginal cells that fail one at a time, not all at once. My previous installs may have been fine purely because the damaged block sat in a package they didn’t need. Installing an OS from known-corrupt media is how you get mysterious failures three weeks later that look like anything except the real cause.
The fix took fifteen minutes: rewrite the stick with Fedora Media Writer (which verifies both the download checksum and the written stick), boot, test again, watch it count to 100%. Verification steps pay off precisely when you least expect them to — this one earned its keep on the stick’s third outing.
Anaconda without fear
Boot the stick (F12, pick the UEFI entry), start the live session, launch the installer. Before touching Anaconda, I ran a quick verification in Konsole:
lsblk -o NAME,SIZE,MODEL,TYPEThis lists every drive with model names, so you know exactly which device is your target before the installer asks. NVMe numbering follows slot enumeration, not your mental order — verify, don’t assume. My 4TB Samsung 990 EVO Plus was nvme2n1.
In the installer, the Installation Destination screen is the only one that deserves real caution:
- Tick only the target disk. Every other drive stays unticked.
- Leave storage configuration on Automatic.
- Do not tick “free up space by removing or shrinking existing partitions” — you already made the room from inside Windows, where it’s done safely. This checkbox is the one dangerous button on the screen.
Then read the review screen like a contract. Mine showed four lines, and every one said “format as” against a new partition: a 629MB EFI partition, a 2.15GB ext4 /boot, and a 212GB Btrfs partition listed twice — once mounted at / and once at /home. That double listing isn’t an error: it’s one partition holding two Btrfs subvolumes sharing the same pool. The words you never want to see on this screen are delete or resize. If they appear, stop.
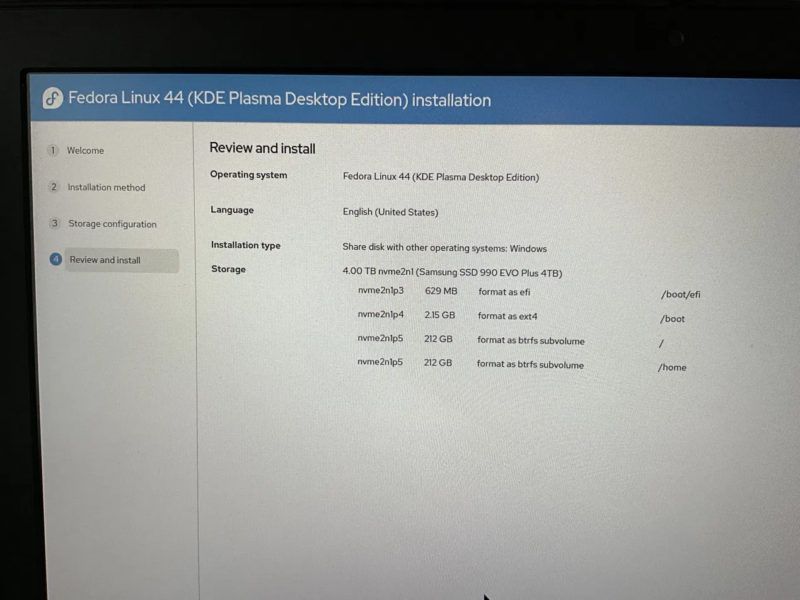
Note what Anaconda did there: it created Fedora’s own EFI partition on the Linux drive. The Windows EFI partition on drive one was never touched. Two self-contained operating systems, one F12 boot menu between them.
Sidebar: why rolling back root doesn’t eat your homework
That root/home subvolume split looks like arbitrary bookkeeping until you hear the failure mode it prevents — then it looks inevitable. Everything dnf does lands on the root subvolume: packages into /usr, config into /etc, databases into /var. Your documents, projects and browser profiles live in /home, a separate subvolume.
So when a bad update forces a snapper rollback of root, your three days of writing sail through untouched. If home were included in the rollback, undoing a broken update would also undo your work — a cure worse than the disease. The split is what makes rollback safe to use casually, which is the whole point of setting up snapper on day one. (A second, independent snapper config for /home is possible and occasionally lovely — but that’s “I deleted a chapter yesterday” protection, a different problem from update protection.)
First boot and the WiFi false alarm
After install and reboot, Fedora came up, I created my user, entered the WiFi password — and the connection spun, dropped, and retried in an endless loop. Having recently fought genuine WPA3 driver battles on older hardware, I braced for another round.
It was a typo. NetworkManager’s most annoying habit is that on an authentication failure it silently retries the stored (wrong) password forever rather than asking you again. The looping connect-disconnect dance looks exactly like a driver problem and is usually a credentials problem. The fix: network icon → connection settings → Wi-Fi Security tab, tick “show password”, and retype it where you can see what you’re doing. Cheapest suspect first — a lesson that applies to most of IT and a good chunk of life.
The result
Total damage: one afternoon, including all detours. The P15 now boots Windows for Unreal Engine and Fedora 44 KDE for everything else, each OS with its own EFI partition on its own drive, incapable of breaking each other. Btrfs with snapper snapshots went on immediately — the same setup as the rest of my fleet — and the first thing I did before installing the NVIDIA driver was take a clean baseline snapshot.
That NVIDIA driver install — with Secure Boot enabled, which nearly every guide pretends doesn’t exist — turned into enough of an adventure to deserve its own article: NVIDIA Drivers on Fedora, the Modern Way. See you there.