
![]() Imagine you’ve created a project in Xcode with a local Git repository. Now you’d like to put this online so that others can collaborate with you. How do you do that?
Imagine you’ve created a project in Xcode with a local Git repository. Now you’d like to put this online so that others can collaborate with you. How do you do that?
This has been puzzling me for a while, and there doesn’t seem to be a clear documentation on this subject – so I’ve decided to take some notes as I figured it out. Here are step by step instructions on how to make it work.
All we need is a server running Git and SSH credentials to that server to get started.
A Git repo on your local system and the remote system is more or less an exact replica – that’s what makes Git such a strong contender for version control: you can work off-line for a while, then “sync” with the remote and all your off-line commits will be available on the remote. This is perfect for app development on the go. Subversion requires a connection to the remote for each commit which makes it less suitable for such ventures.
Besides, Git is so well integrated into Xcode that we’d be fools not to make the most of it. But you already knew this and you’re eager to get started, so let’s do that.
Step 1: Install the Xcode Command Line Tools
Before Mountain Lion things such as Git were pre-installed on every Mac. But since we’re in a recession they took some of those developer tools away. You can easily bring them back by installing the Command Line Tools. So before we begin you need to make sure these are installed, otherwise we’ll have trouble in the next step.
Open Xcode and head over to Xcode – Preferences – Downloads – Components to bring up this window:
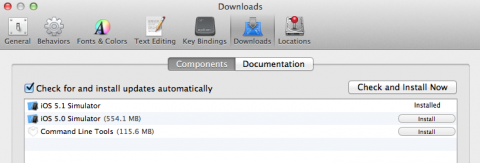
Click the install button and grab a coffee while they download and install automatically. Once done, close Xcode and restart your machine.
Step 2: Create a bare copy of your local repository
Before we can use a remote we need to give the server a “bare” copy of your Git repo. Which means we’ll have a bit of command line hacking to do (there’s no need to be frightened here kids).
Open the Terminal app on your Mac (you can find it in Applications / Utilities) and type “git” just for a laugh. You should get a list of commonly used Git commands if all is well. If you get a “command not found” message then you have not installed those Command Line Tools.
Let’s assume your Xcode project lives in a folder called Testing and you’re already in the directory just below that. So for arguments sake, your project lives in iOS/Testing, you’d first type
cd iOS
and bring up a directory listing with ls. This should show your folder Testing, in which all your project files live. We’ll create a bare repository of your entire folder by typing
git clone --bare Testing Testing.git
If you type ls again, you’ll see your original folder (Testing) and another folder called Testing.git. The latter is your bare repository and is ready to be populated. Result!
But what if I dont wish to make a new bare repository. Instead I wish to use the local .git file that is here: /%PROJECT FOLDER%/.git ?
Hi Jaro,
In that case, just head over to the Xcode Repository browser (in the Organizer) and click the little plus icon on the bottom left. You can add a local repository there.