
There are several ways to install MySQL on your Mac, for example:
- compile from source
- use the Homebrew package manager (http://brew.sh)
- use a nifty script courtesy of Mac Mini Vault (http://git.io/eUx7rg)
- or use the dedicated MySQL installer package (recommended)
I recommend the dedicated installer because it’s the only package that will also add a convenient Preference Pane for starting and stopping the service.
In this article I’ll focus on the latter, and I’ll also talk you through how to add MySQL to the PATH variable and how to secure MySQL to keep the evildoers away from your server.
These instructions will work on Yosemite and El Capitan (I’ve tested it on both systems – in fact that’s part of why I’m writing this, so that I can remember for next time).
Downloading and installing MySQL
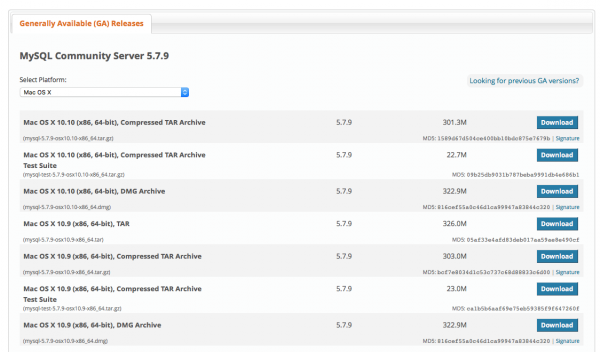
You’ll find several packages at the MySQL website in the downloads section: http://dev.mysql.com/downloads/mysql/
If that link isn’t working, head over to http://mysql.com and find the Downloads section. Hunt for something called the Community GPL Downloads, and for a section called MySQL Community Server. That’s the Open Source version of MySQL. Pick a platform from the drop down menu (Mac OS X).
Again there are several versions you can download. You’ll probably want the DMG Archive equivalent to the version of OS X you’real running (this screenshot was taken in November 2015, things may have changed since then):
Double-click the file and you’ll be guided through a standard OS X installation. When the installer has finished, MySQL is installed on your system – but of course it’s neither running nor configured yet. We’ll take care of that in the next step.
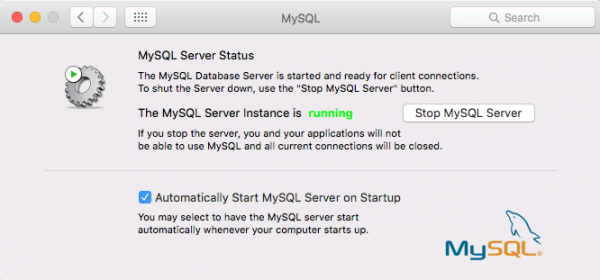
Take a look under (Apple Logo) – System Preferences and see if you can find the MySQL Preference Pane. If you see that, all is well.
Starting and stopping MySQL
Start MySQL using the preference pane I’ve just mentioned. Tick the box that reads “automatically start MySQL server on startup” if you want that behaviour.
If you ever want to start/stop MySQL, this is the most convenient place to do it on your Mac. At times however, that fancy button is greyed out, which means that the Launch Daemon isn’t running. Should this happen, start the daemon via the command line manually, like this:
// starting the daemon manually
sudo launchctl start com.mysql.mysql

// stopping the daemon manually
sudo launchctl stop com.mysql.mysql
You’ll need to provide your password (for Administrator privileges and all).
Adding easy command line access to MySQL
Before we can start using MySQL with fancy GUI tools, it’s probably wise to make it easily accessible from the command line as well. This step is optional but highly recommended should you wish to do any command line hacking that involves MySQL.
In OS X (and many other *NIX type distributions), MySQL is installed at /usr/local/mysql. In this folder we’ll have to execute several commands, each a folder or so deep. It’s tedious having to type this out every time.
To make it easier we can add a temporary alias to our shell. Or better yet, add this location to the PATH variable.
Here’s how to setup an alias:
alias mysql=/usr/local/mysql/bin/mysql
alias mysqladmin=/usr/local/mysql/bin/mysqladmin
This will work fine until you quit Terminal and start a new session. Aliases are only temporary.
Here’s how to tweak that PATH variable instead for a permanent solution:
Create a new file in your home directory and call it .bash_profile.
cd
vi ./bash_profile
Now add the following line to it:
export PATH="/usr/local/mysql/bin:$PATH"
Save and quit vi, then close the Terminal session. Open a new session and your PATH will now be amended with the MySQL location. Note that the .bash_profile file will automatically be deleted for your convenience as soon as the PATH is updated.
Try typing mysqladmin now and see what happens. You should see a long list of options. If you see a “command not found” error instead, something didn’t work out with the alias or PATH tweak.
Securing MySQL
MySQL comes with a handy script that will secure your installation. It lets you set a root user password, (dis-)allow remote access and remove test databases and users. I highly recommend you run it before using MySQL, especially when you’re deploying on production servers.
The following command will only work if the above has been added to the PATH variable, this won’t work with aliases:
mysql_secure_installation
Alternatively, you can call the script with the full path:
/usr/local/mysql/bin/mysql_secure_installation
Using MySQL on your Mac
With all the above in place, you’re good to use MySQL on your Mac the usual way. You’ll find all the gory details at http://mysql.com.
A couple of things to know:
MySQL on OS X doesn’t like the value “localhost”. Instead, use 127.0.0.1 (don’t ask me why). WordPress for example won’t connect when you use localhost as your DB_HOST value.
If you’re looking for a graphical admin tool, there’s a SUPERB tool available for your Mac that exclusively deals with administering MySQL databases and users: it’s called Sequel Pro: http://sequelpro.com. It’s also open source and it’s simply phenomenal: it allows you to administer local and remote databases and user accounts, and it’s a native OS X app.
Rather than creating users and databases from the command line (which of course works fine), Sequel Pro will be of great help to you.
Just one more thing…
MySQL will install itself listening to its default port of 3306.
However, if you have previously installed MySQL via another method (Homebrew for example), and you decided that you really wanted that swanky Preference Pane, then the Mac installer will go ahead and install MySQL again – but it’s clever enough to notice that port 3306 is already being used by something else.
In which case, the default port for the Mac installation will become the next available higher port, for example 3307. It won’t uninstall the previous MySQL, or amend it.
Sadly the OS X installation does not use a configuration file (such as /etc/my.cnf ), but there’s a workaround that’s described here: http://stackoverflow.com/questions/5320424/change-port-for-mysql-on-mac
With all that said, enjoy!
You can find that DMG file here: http://mysql.mirror.ac.za/Downloads/MySQL-5.7/